Prerequisites
During portions of the installation you'll need to have root access to your machine.
Make sure you've installed the following packages on your Fedora installation before continuing.
* Apache
* GCC compiler
* GD development libraries
You can use yum to install these packages by running the following commands (as root):
yum install httpd
yum install gcc
yum install glibc glibc-common
yum install gd gd-devel
1) Create Account Information
Become the root user.
su -l
or
sudo su
Create a new nagios user account and give it a password.
/usr/sbin/useradd -m nagios
passwd nagios
Create a new nagcmd group for allowing external commands to be submitted through the web interface. Add both the nagios user and the apache user to the group.
/usr/sbin/groupadd nagcmd
/usr/sbin/usermod -a -G nagcmd nagios
/usr/sbin/usermod -a -G nagcmd apache
2) Download Nagios and the Plugins
Create a directory for storing the downloads.
mkdir ~/downloads
cd ~/downloads
Download the source code tarballs of both Nagios and the Nagios plugins (visit http://www.nagios.org/download/ for links to the latest versions). At the time of writing, the latest versions of Nagios and the Nagios plugins were 3.0.3 and 1.4.11, respectively.
wget http://osdn.dl.sourceforge.net/sourceforge/nagios/nagios-3.0.6.tar.gz
wget http://osdn.dl.sourceforge.net/sourceforge/nagiosplug/nagios-plugins-1.4.11.tar.gz
3) Compile and Install Nagios
Extract the Nagios source code tarball.
cd ~/downloads
tar xzf nagios-3.0.6.tar.gz
cd nagios-3.0.6
Run the Nagios configure script, passing the name of the group you created earlier like so:
./configure --with-command-group=nagcmd
Compile the Nagios source code.
make all
Install binaries, init script, sample config files and set permissions on the external command directory.
make install
make install-init
make install-config
make install-commandmode
Don't start Nagios yet - there's still more that needs to be done...
4) Customize Configuration
Sample configuration files have now been installed in the /usr/local/nagios/etc directory. These sample files should work fine for getting started with Nagios. You'll need to make just one change before you proceed...
Edit the /usr/local/nagios/etc/objects/contacts.cfg config file with your favorite editor and change the email address associated with the nagiosadmin contact definition to the address you'd like to use for receiving alerts.
vi /usr/local/nagios/etc/objects/contacts.cfg
(you can use any editor as you wish)
5) Configure the Web Interface
Install the Nagios web config file in the Apache conf.d directory.
make install-webconf
Create a nagiosadmin account for logging into the Nagios web interface. Remember the password you assign to this account - you'll need it later.
htpasswd -c /usr/local/nagios/etc/htpasswd.users nagiosadmin
Restart Apache to make the new settings take effect.
service httpd restart
Note Note: Consider implementing the ehanced CGI security measures described here to ensure that your web authentication credentials are not compromised.
6) Compile and Install the Nagios Plugins
Extract the Nagios plugins source code tarball.
cd ~/downloads
tar xzf nagios-plugins-1.4.11.tar.gz
cd nagios-plugins-1.4.11
Compile and install the plugins.
./configure --with-nagios-user=nagios --with-nagios-group=nagios
make
make install
7) Start Nagios
Add Nagios to the list of system services and have it automatically start when the system boots.
chkconfig --add nagios
chkconfig nagios on
Verify the sample Nagios configuration files.
/usr/local/nagios/bin/nagios -v /usr/local/nagios/etc/nagios.cfg
If there are no errors, start Nagios.
service nagios start
8) Modify SELinux Settings
Fedora ships with SELinux (Security Enhanced Linux) installed and in Enforcing mode by default. This can result in "Internal Server Error" messages when you attempt to access the Nagios CGIs.
See if SELinux is in Enforcing mode.
getenforce
Put SELinux into Permissive mode.
setenforce 0
To make this change permanent, you'll have to modify the settings in /etc/selinux/config and reboot.
Instead of disabling SELinux or setting it to permissive mode, you can use the following command to run the CGIs under SELinux enforcing/targeted mode:
chcon -R -t httpd_sys_content_t /usr/local/nagios/sbin/
chcon -R -t httpd_sys_content_t /usr/local/nagios/share/
For information on running the Nagios CGIs under Enforcing mode with a targeted policy, visit the NagiosCommunity.org wiki at http://www.nagioscommunity.org/wiki.
9) Login to the Web Interface
You should now be able to access the Nagios web interface at the URL below. You'll be prompted for the username (nagiosadmin) and password you specified earlier.
http://localhost/nagios/
Click on the "Service Detail" navbar link to see details of what's being monitored on your local machine. It will take a few minutes for Nagios to check all the services associated with your machine, as the checks are spread out over time.
10) Other Modifications
Make sure your machine's firewall rules are configured to allow access to the web server if you want to access the Nagios interface remotely.
Configuring email notifications is out of the scope of this documentation. While Nagios is currently configured to send you email notifications, your system may not yet have a mail program properly installed or configured. Refer to your system documentation, search the web, or look to the NagiosCommunity.org wiki for specific instructions on configuring your system to send email messages to external addresses. More information on notifications can be found here.
What You'll End Up With
If you follow these instructions, here's what you'll end up with:
* Nagios and the plugins will be installed underneath /usr/local/nagios
* Nagios will be configured to monitor a few aspects of your local system (CPU load, disk usage, etc.)
* The Nagios web interface will be accessible at http://localhost/nagios/
Wednesday, July 29, 2009
Monday, July 27, 2009
Solved : Adding Perfromace Data to External Scripts in NSClient++ for Nagios
Insering Perfromance data to the External Script that you executes with NSClient++ to send data to Nagios Monitoring Server. For that simply you can create a .bat file as follows.
echo off
echo <string>^|<performance data>
exit <code>
Explanantion of the tags given in the sample can be given as follows.
<string> : Just a string with Nagios Status Information. No Specific way of this string
^| : the HAT (^) mark before the pipe(|) is used to avoid the pipe symbol making a dos command
<performance data> : Making this data in a specific way helps you to use many graphing techniqus (such as pnp4nagios) without any problem. It should come as "<key>=<value>;<warn>;<critical>;<min>;<max>"
<code> : the code can be a value from 0 to 3. 0-OK, 1-WARNING, 2-CRITICAL, 3-UNKNOWN, will be displayed on Magios Status.
So the final sample code of a .bat file can be shown as follows.
echo off
echo CPU works fine. ^| CPU_Load=34;70;95;0;100
exit 0
This will show that the current CPU_Load is 34, 70 is the level of WARNING and 95 is the level of CRITICAL. And the value varies from 0 to 100. And the exit code 0 shows that the Status is OK. The Status Information shows that "CPU works fine"
For more information you can check Nagios Performance Data, Nagios Plugin API and Thread By Michael Medin on this matter in NSClient++
echo off
echo <string>^|<performance data>
exit <code>
Explanantion of the tags given in the sample can be given as follows.
<string> : Just a string with Nagios Status Information. No Specific way of this string
^| : the HAT (^) mark before the pipe(|) is used to avoid the pipe symbol making a dos command
<performance data> : Making this data in a specific way helps you to use many graphing techniqus (such as pnp4nagios) without any problem. It should come as "<key>=<value>;<warn>;<critical>;<min>;<max>"
<code> : the code can be a value from 0 to 3. 0-OK, 1-WARNING, 2-CRITICAL, 3-UNKNOWN, will be displayed on Magios Status.
So the final sample code of a .bat file can be shown as follows.
echo off
echo CPU works fine. ^| CPU_Load=34;70;95;0;100
exit 0
This will show that the current CPU_Load is 34, 70 is the level of WARNING and 95 is the level of CRITICAL. And the value varies from 0 to 100. And the exit code 0 shows that the Status is OK. The Status Information shows that "CPU works fine"
For more information you can check Nagios Performance Data, Nagios Plugin API and Thread By Michael Medin on this matter in NSClient++
Thursday, July 23, 2009
Problem "rrd not found" (Nagios - PNP)
If you start adding the plug-in to make graphs for Nagios using PNP, you might not succeed with all the services that you monitor in Nagios.

The first thing that you should check is the availability of performance data in the particular service. But if it is empty as shown below PNP will not generate any of the graphs for it.
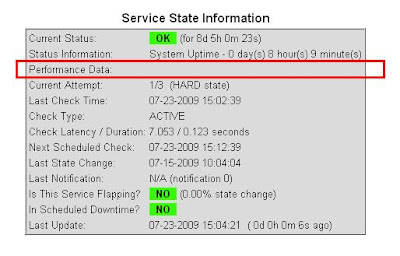
So you have to find a way to add Performance data to the specific service to make the graphs. Currently im going to search the way of doing it. And I'll post about it very sooner.
Check my next post for the answer.
Monday, July 13, 2009
Problem reading Google RSS from Java
I dont know why the google makes it a problem. But when you try to access a RSS feed posted by google from java application it gives the following error.
Here im using Rome to read the RSS feeds made by a google group. Here other than passing the url to XmlReader, im passing a URLConnection. But the difference is, here im faking this request as a request made by a Mozilla browser, by setting up the User-agent property.
And i guess you cant make more than 1000 requests for the google per day. So dont make any applications which exceed that limit.
Enjoy !!
java.io.IOException: Server returned HTTP response code: 403 for URL:
Here im using Rome to read the RSS feeds made by a google group. Here other than passing the url to XmlReader, im passing a URLConnection. But the difference is, here im faking this request as a request made by a Mozilla browser, by setting up the User-agent property.
urlConn.setRequestProperty("User-agent","Mozilla/2.0.0.11");
reader = new XmlReader(urlConn);
SyndFeedInput input = new SyndFeedInput();
SyndFeed feed = input.build(reader);
And i guess you cant make more than 1000 requests for the google per day. So dont make any applications which exceed that limit.
Enjoy !!
Read RSS using ROME ( sample code )
ROME is an open source tool to parse, generate and publish RSS and Atom feeds. Using Rome you can parse the available RSS and Atom feeds. Without bothering about format and version of RSS feed. The core library depends on the JDOM XML parser.
Considering you have all the required jar files we will start with reading the RSS feed. ROME represents syndication feeds (RSS and Atom) as instances of the com.sun.syndication.synd.SyndFeed interface. This library can be downloaded from here.
ROME includes parsers to process syndication feeds into SyndFeed instances. The SyndFeedInput class handles the parsers using the correct one based on the syndication feed being processed. The developer does not need to worry about selecting the right parser for a syndication feed, the SyndFeedInput will take care of it by peeking at the syndication feed structure.
A sample java code can be described as follows:
package com.infosys.hanumant.rome;

import java.net.URL;
import java.util.Iterator;

import com.sun.syndication.feed.synd.SyndEntry;
import com.sun.syndication.feed.synd.SyndFeed;
import com.sun.syndication.io.SyndFeedInput;
import com.sun.syndication.io.XmlReader;

/**
* @author Hanumant Shikhare
*/
public class Reader {

public static void main(String[] args) throws Exception {

URL url = new URL("http://viralpatel.net/blogs/feed");
XmlReader reader = null;

try {

reader = new XmlReader(url);
SyndFeed feed = new SyndFeedInput().build(reader);
System.out.println("Feed Title: "+ feed.getAuthor());

for (Iterator i = feed.getEntries().iterator(); i.hasNext();) {
SyndEntry entry = (SyndEntry) i.next();
System.out.println(entry.getTitle());
}
} finally {
if (reader != null)
reader.close();
}
}
}
Sunday, July 05, 2009
email to rss
How to convert an email message to a RSS feed. But again we need to think why we are doing this. This will be the easiest way to publish many ideas of different people into a one single site, or many of them.
In the web there are some systems available like MailBucket. And these are some gateways which converts email messages to a RSS feed.
But if you check in Google Groups, it will give you a faster and easy way to convert all the mails which are going inside the group emails.
In the web there are some systems available like MailBucket. And these are some gateways which converts email messages to a RSS feed.
But if you check in Google Groups, it will give you a faster and easy way to convert all the mails which are going inside the group emails.
Subscribe to:
Posts (Atom)